In this tutorial, I will show you (1) how to use PicMonkey to create a collage of your photo-designs and (2) how to upload the collage to Spoonflower for printing on fabric.
Before we dive into the tutorial, here’s a little background information: The quilt patterns that I am designing (you can read about them here – Sketches, Selfie Quilt and Colors of My Heart) use what I call “photo-designs.” What are photo designs? These are photos that you have converted digitally to an artistic design/image using an App (or Photoshop/other design software) on your smart phone or iPad/tablet. I’m a big fan of using an App on your smart phone, iPad/tablet to create a photo design. Of course, you can do this in Photoshop but it’s more complicated. With a few clicks of an App, you’re done – way too easy, fun and warning – addicting too.
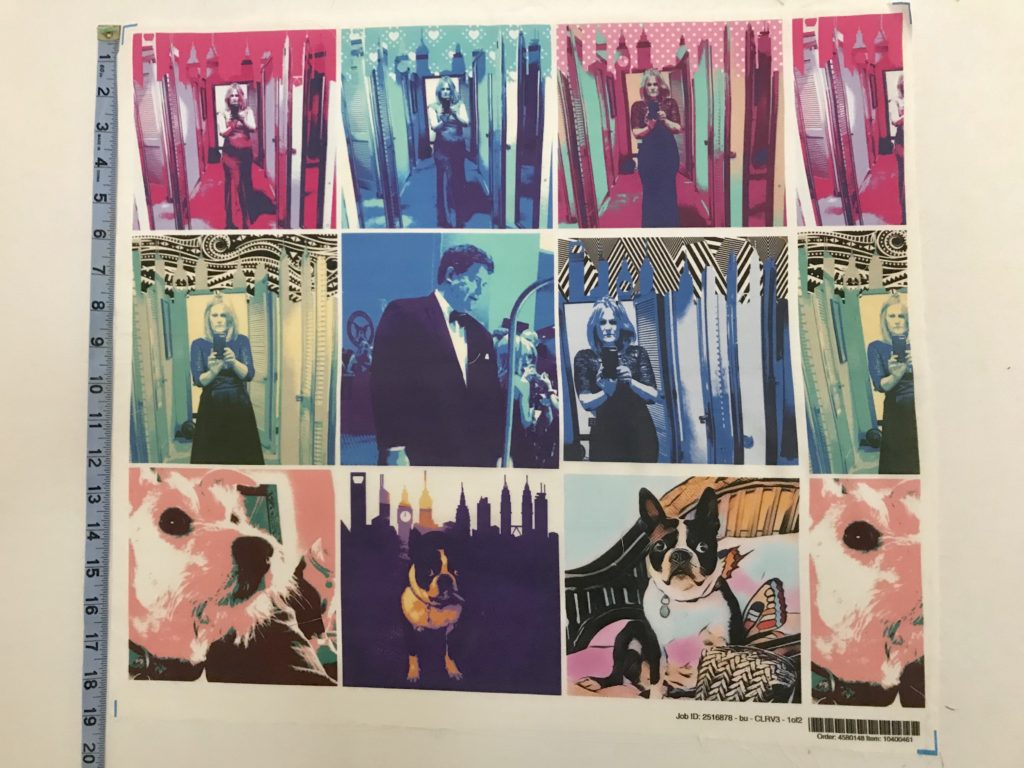
So how do you get these photo designs onto fabric? I use Spoonflower and usually print 9 photo-design “blocks” on one fat quarter. But to do this, I first place the photo-designs in a collage or 9 block grid. This is the most cost effective way to print, as it wastes very little fabric. When printed, each block is 4-6 inches in size, depending on the adjustments you make in Spoonflower.
So back to the tutorial: If you’re not familar with PicMonkey, it is an online design program; I use the computer version, and that is what this tutorial is for, but they also an App. Another added bonus of PicMonkey is that it “plays well” with Spoonflower. To get started on PicMonkey, you will need to sign up for an account. I believe they also have a free 14 day trial.
Before you begin, make sure you have your photo-designs saved on your computer. After I’ve created the photo designs on my smart phone, I simply email them to myself, and then download the photo designs to a file on my computer. There are other ways “transfer” the photo designs to your computer, like using Dropbox, Google Photos, but I just email them to myself. Okay, let’s begin!
Tutorial: (1) Creating a Collage in PicMonkey with your Photo Designs and (2) Uploading the Collage to Spoonflower
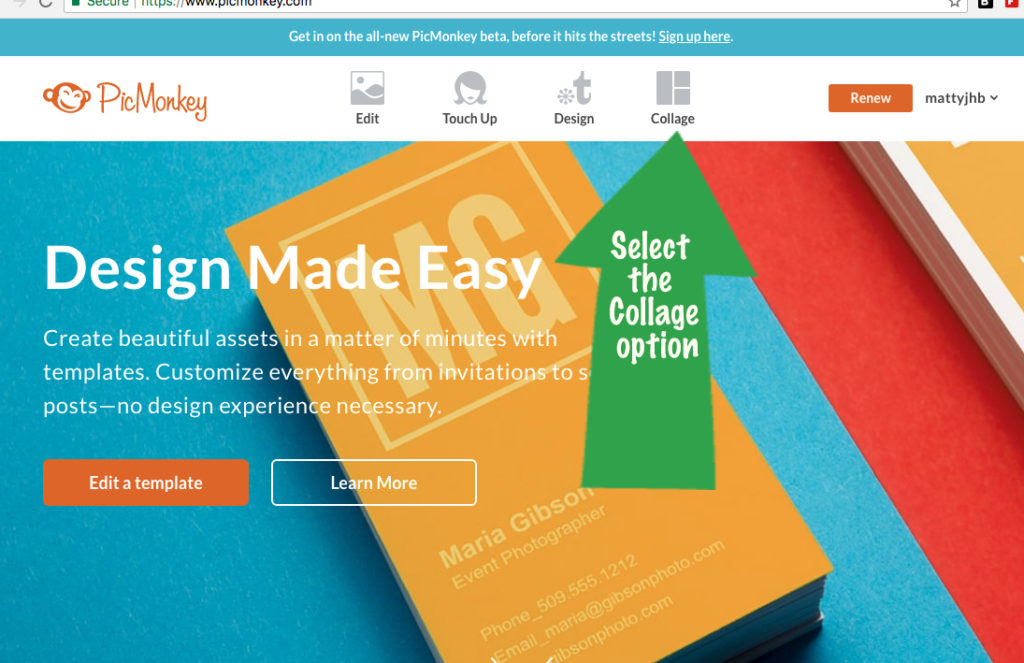
1. SELECT THE COLLAGE OPTION: Sign into PicMonkey and from the PicMonkey home page, and select the Collage Option:
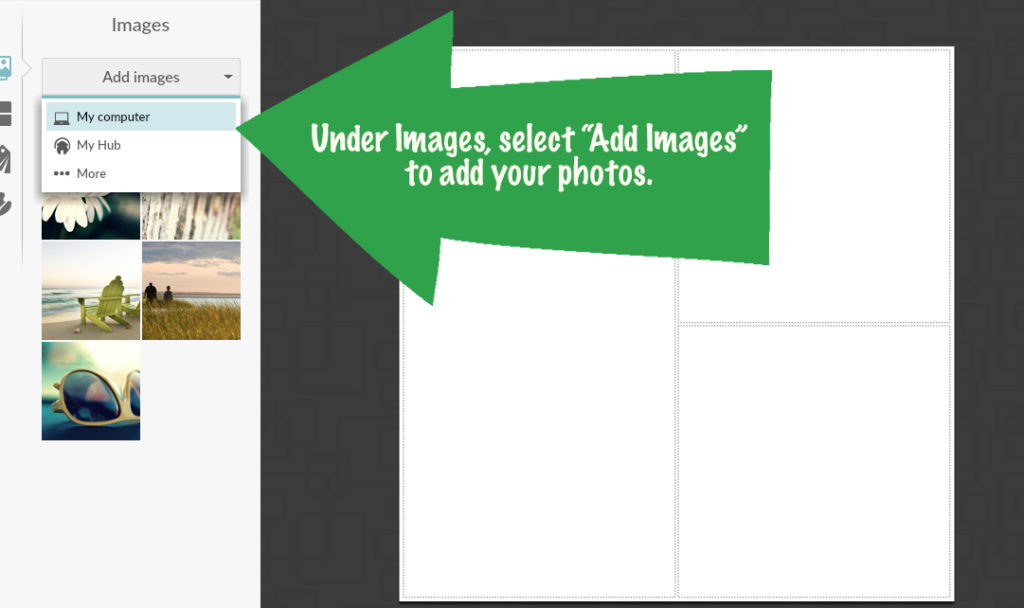
2. UPLOAD PHOTOS FROM YOUR COMPUTER TO PICMONKEY: Click on the Image icon, and under “Add Images” select “My computer”, to get your photos from your computer.
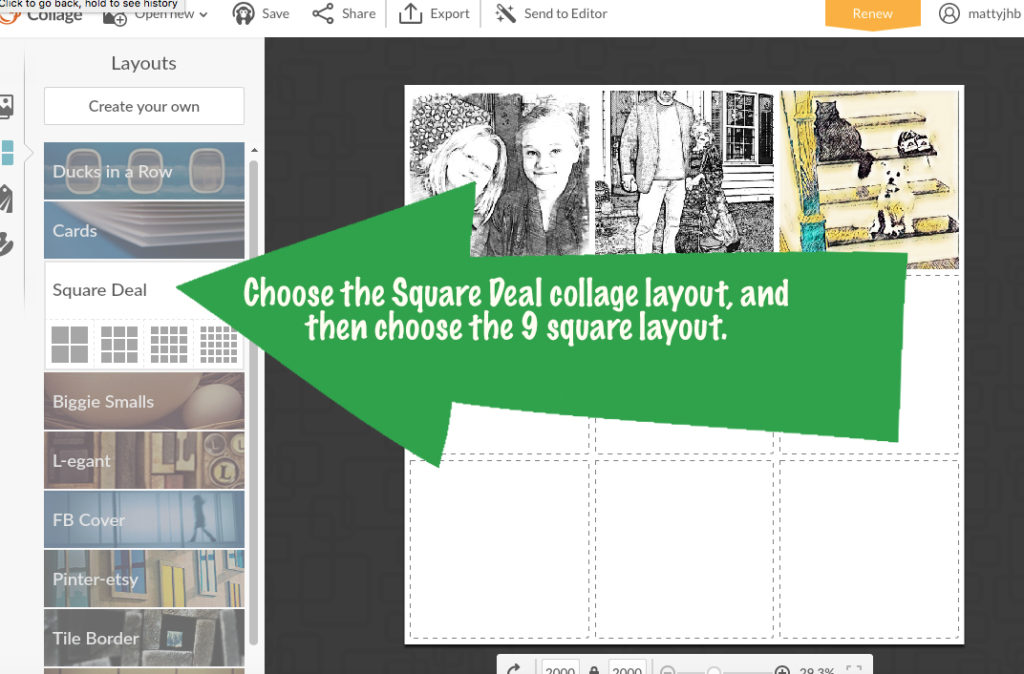
3. CHOOSE THE COLLAGE STYLE: Click on the collage icon, and choose “Square Deal” and then the collage with nine squares (or whatever size collage you are going use – I usually use the nine squares or the four square collage.)
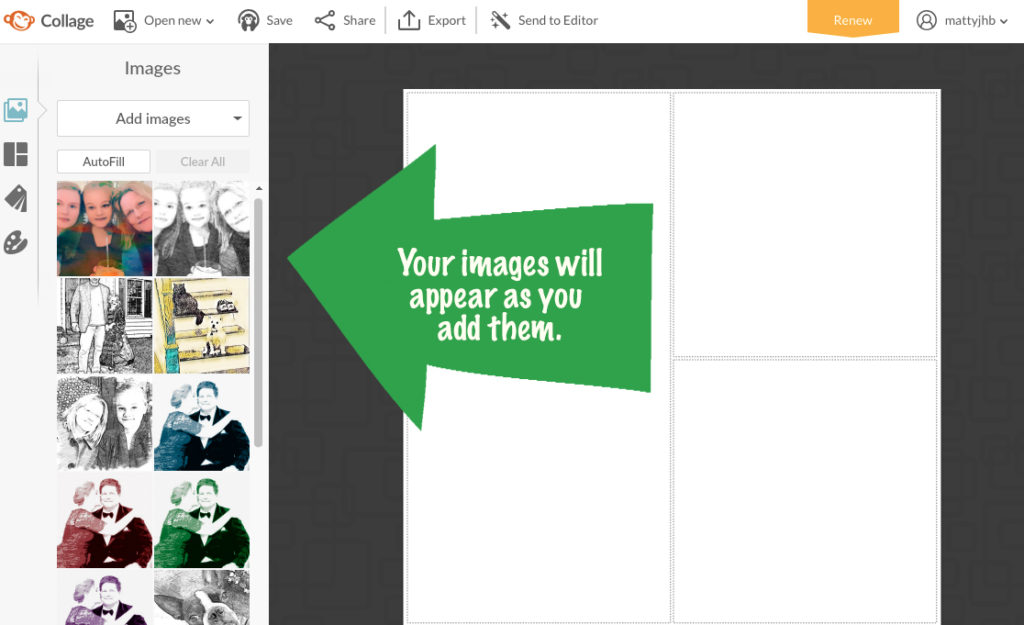
4. INSERT YOUR PHOTOS INTO THE COLLAGE: Click on the photo you want to insert into the collage and slide it into one of the boxes on the collage. If you need to adjust the size/position of the photo, click on the pencil icon on the photo in the collage and an “Edit Image” box will appear. From that box, make your edits as needed. I may do a few tweaks, but nothing other than adjusting the size a bit. Because remember you did all the graphic design work beforehand with the App – now you’re just putting the photo designs in the collage for printing.

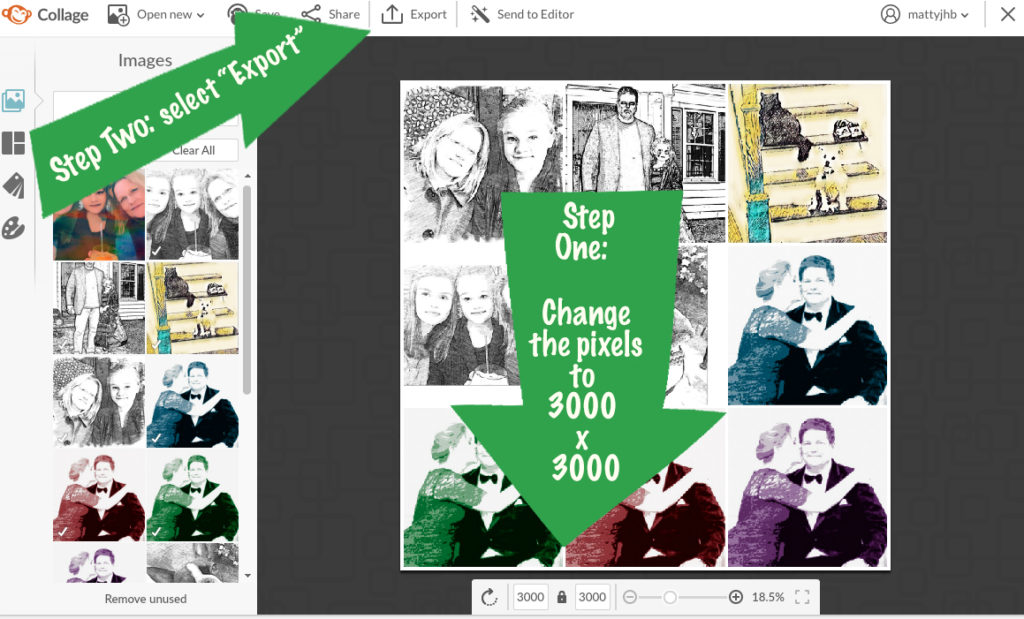
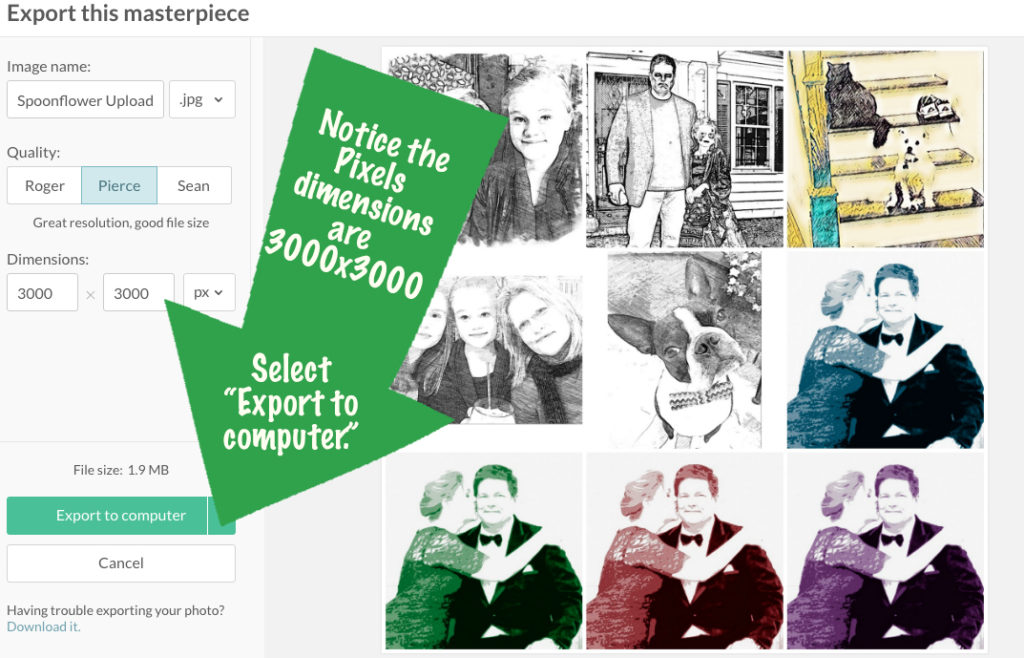
5. SAVE YOUR FINISHED COLLAGE TO THE PICMONKEY LIBRARY OR EXPORT IT TO YOUR COMPUTER: Once your collage is done, you can either save it your PicMonkey library or export it to your computer. The benefit of saving it to your PicMonkey library is that it can changed in the future, as it isn’t flattened . When you export it, it gets flattened, meaning that all the various images become one image, and it can’t be edited/revised again in PicMonkey. Since I don’t plan on editing my collages, I just export them to my computer. HERE’S A VERY IMPORTANT STEP – make sure to change the pixel dimension to 3000×3000. It is automatically set at 2000×2000 but to get the correct size for printing on a fat quarter in Spoonflower, you need to change it to 3000×3000 pixels. Do this before you export it to your computer. So FIRST change the pixel dimension, and then export it to your computer.
You’re done with creating the collage of your photo designs. You can now upload it to Spoonflower.
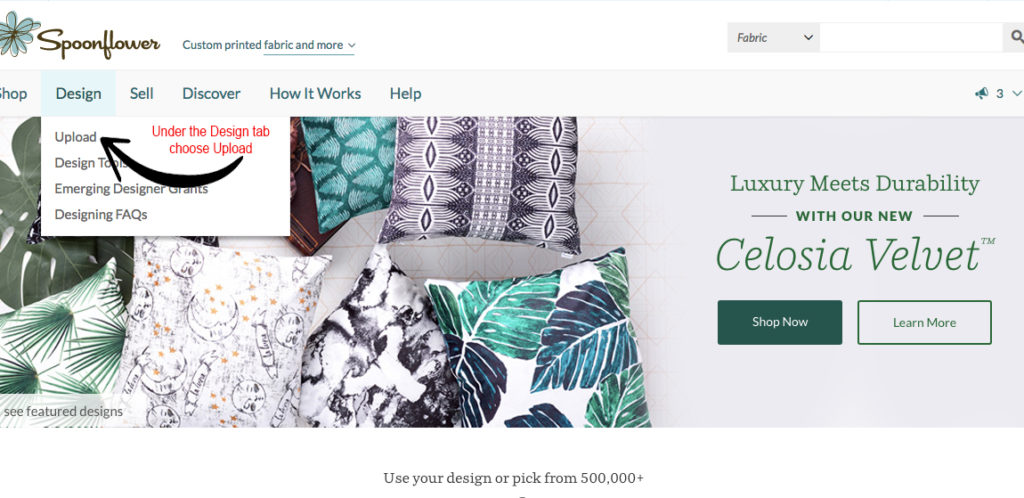
6. UPLOAD TO SPOONFLOWER: Head over to the Spoonflower website. If you don’t have a Spoonflower account it’s easy to set one up and no cost to do this. Click on the Design tab and then choose Upload.
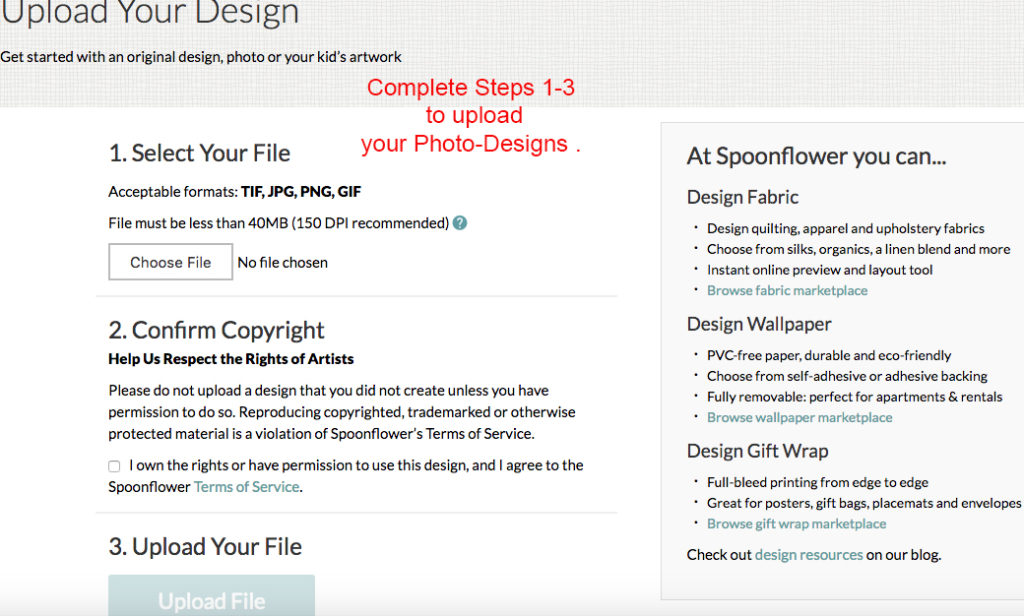
7.COMPLETE THE THREE STEPS ON THE UPLOAD PAGE: Follow steps 1-3 on the Spoonflower upload page. The file type that you should created in PicMonkey is a JPG. Spoonflower will accept 4 files types, a TIF, JPG, PNG or GIF. Most common will be a JPG.
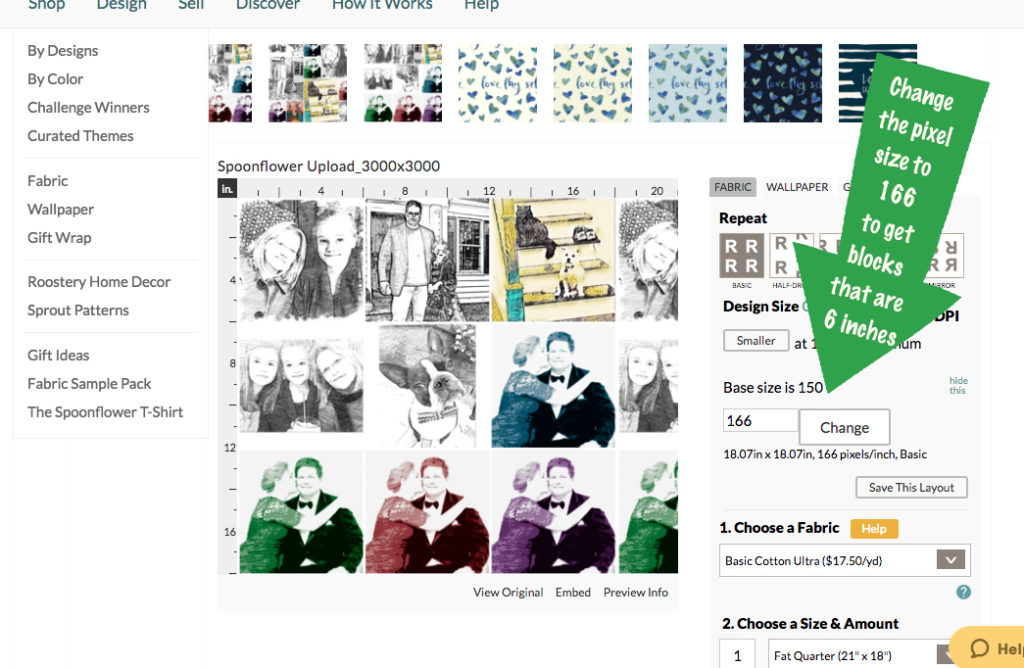
8. ADJUST THE PIXEL SIZE TO GET THE CORRECT BLOCK SIZE: Spoonflower will bring the image in at 150 dpi, so you will need change this to 166 to get 6 inch sized blocks.
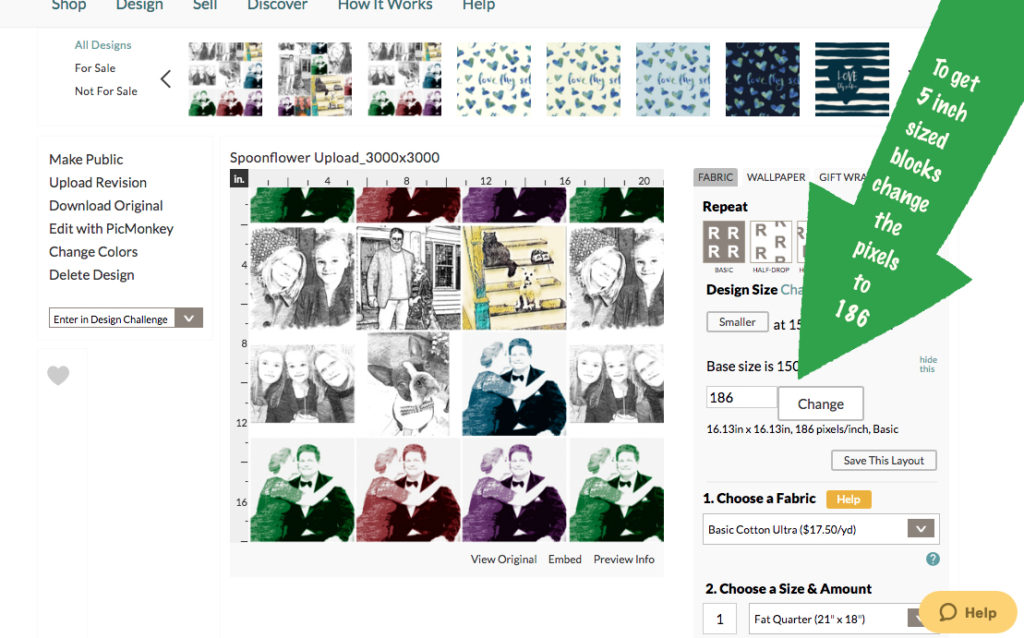
And If you want 5 inch sized blocks, change it to 186. You will get one set of repeat blocks this way.
For the Repeat, keep the setting at Basic. Choose the type of fabric you want to print on; I’ve always used the basic cotton. Also choose the fabric size, which will be a fat quarter. Select ADD TO CART and finish the purchase process.
Shipping is $1.00 if you choose standard shipping, which is 12-14 days. I usually go with this option and usually get it in 7-10 days. Once that fat quarter arrives, it’s time to cut those blocks apart, and use them in a quilt!!!


